- Authors
Micro Frontends: An Introduction and Comprehensive Overview
- Published on
- Published On:
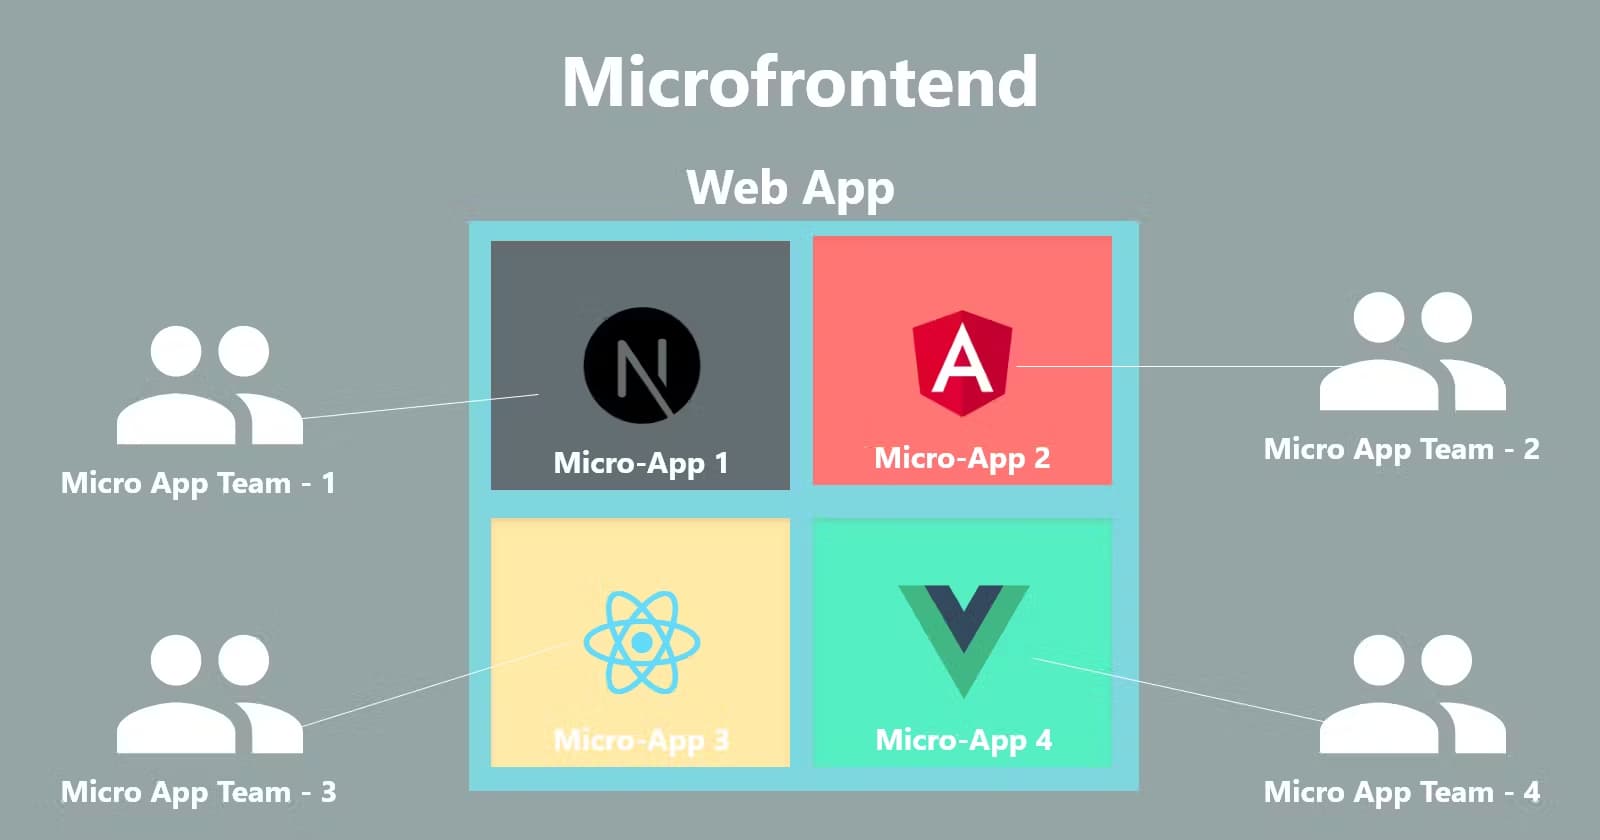
A few months back, I got a chance to work on a legacy project with an AngularJS frontend and a PHP backend. The project about 10-15 years old, had grown complex and difficult to maintain featuring over 50 modules like role management, user management, dynamic report generation and invoice management. Our team were searching for a solution to improve scalability and manageability, which led us to explore microservices on the backend and micro frontend for the frontend. I found the concept of micro frontend intriguing and gained valuable insights along the way.
In this blog, I’ll explain micro frontends, why they are essential, how to implement them, and the advantages they offer. Let's dive in!
The Challenges In Scaling Large Frontend Applications

In today's fast-paced web development industry, scaling large frontend applications presents a number of issues. As applications become increasingly complex, upgrading to a new framework like React, Vue, or Angular may bring some relief, but even these technologies will eventually age and require another revamp. A complete rewrite every few years is time-consuming, costly, and disruptive to development teams.
In addition, large-scale applications sometimes result in slower development cycles since several teams work on the same codebase, resulting in frequent merge conflicts, code dependencies, and coordination difficulties. Maintaining such a monolithic frontend can also be difficult, as even minor changes may necessitate extensive regression testing and redeployment of the entire program, which slows down the release process.
Moreover, scaling teams becomes increasingly complex. With a shared codebase, teams may have to coordinate closely, limiting their liberty. As more features are introduced, the frontend may grow bloated, affecting performance and user experience. Large bundles of JavaScript and CSS might slow initial load times, resulting in a poor user experience for those with poorer network connections.
That’s where micro frontends come into play.
What is a Micro Frontend?
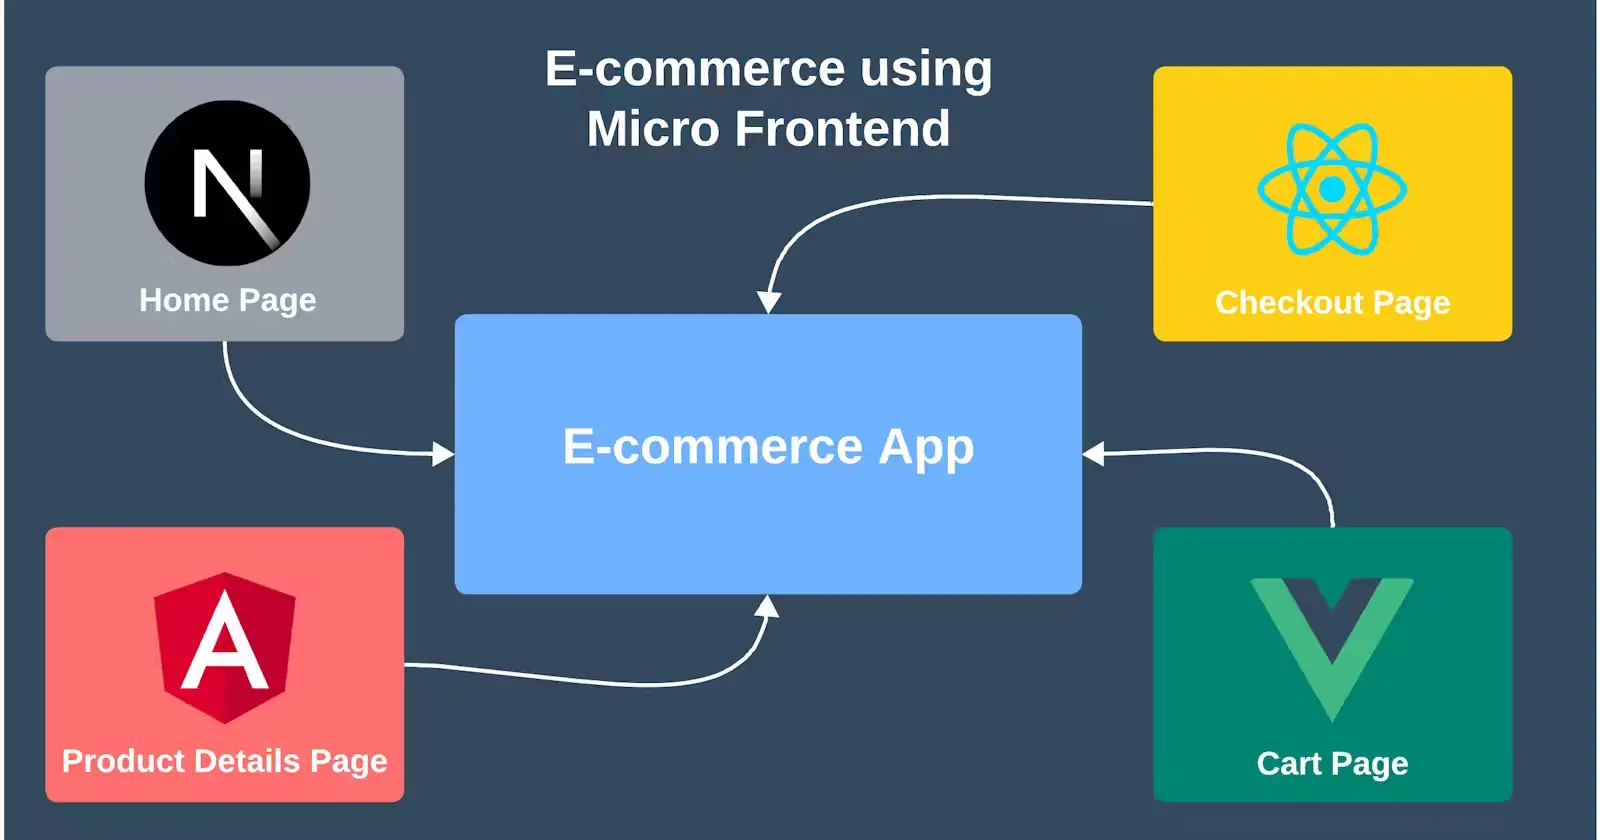
A micro frontend is a method of breaking a frontend application into smaller, semi-independent mini-applications. Each micro frontend can be developed, deployed and updated independently, but they also work together as part of a bigger system. By applying Domain-Driven Design (DDD) principles, teams can concentrate on specific business domains, which enhances efficiency, minimizes conflicts, and ensures alignment with business requirements.
Use Cases for Micro Frontends
- Large and Complex Web Applications: For enterprise-level applications with many features, micro frontends allow for modularity, which helps streamline development.
- Modernization of Legacy Applications: When updating a legacy application, you can incrementally refactor it into micro frontends, allowing parts of the system to evolve without needing a complete overhaul.
- Multi-team Development: In large organizations, multiple teams can work simultaneously on different features or parts of an application. Micro frontends facilitate this by providing clear ownership of individual modules.
Approaches to Implement Micro Frontends
There are several common methods for implementing micro frontends, each with its strengths and trade-offs.
1. Module Federation
Module Federation is one of the most popular ways to implement micro frontends. It allows different applications to dynamically load modules from one another at runtime. This method ensures that teams can work with different versions of a shared library or dependency without conflict.
Example: Module Federation Integration
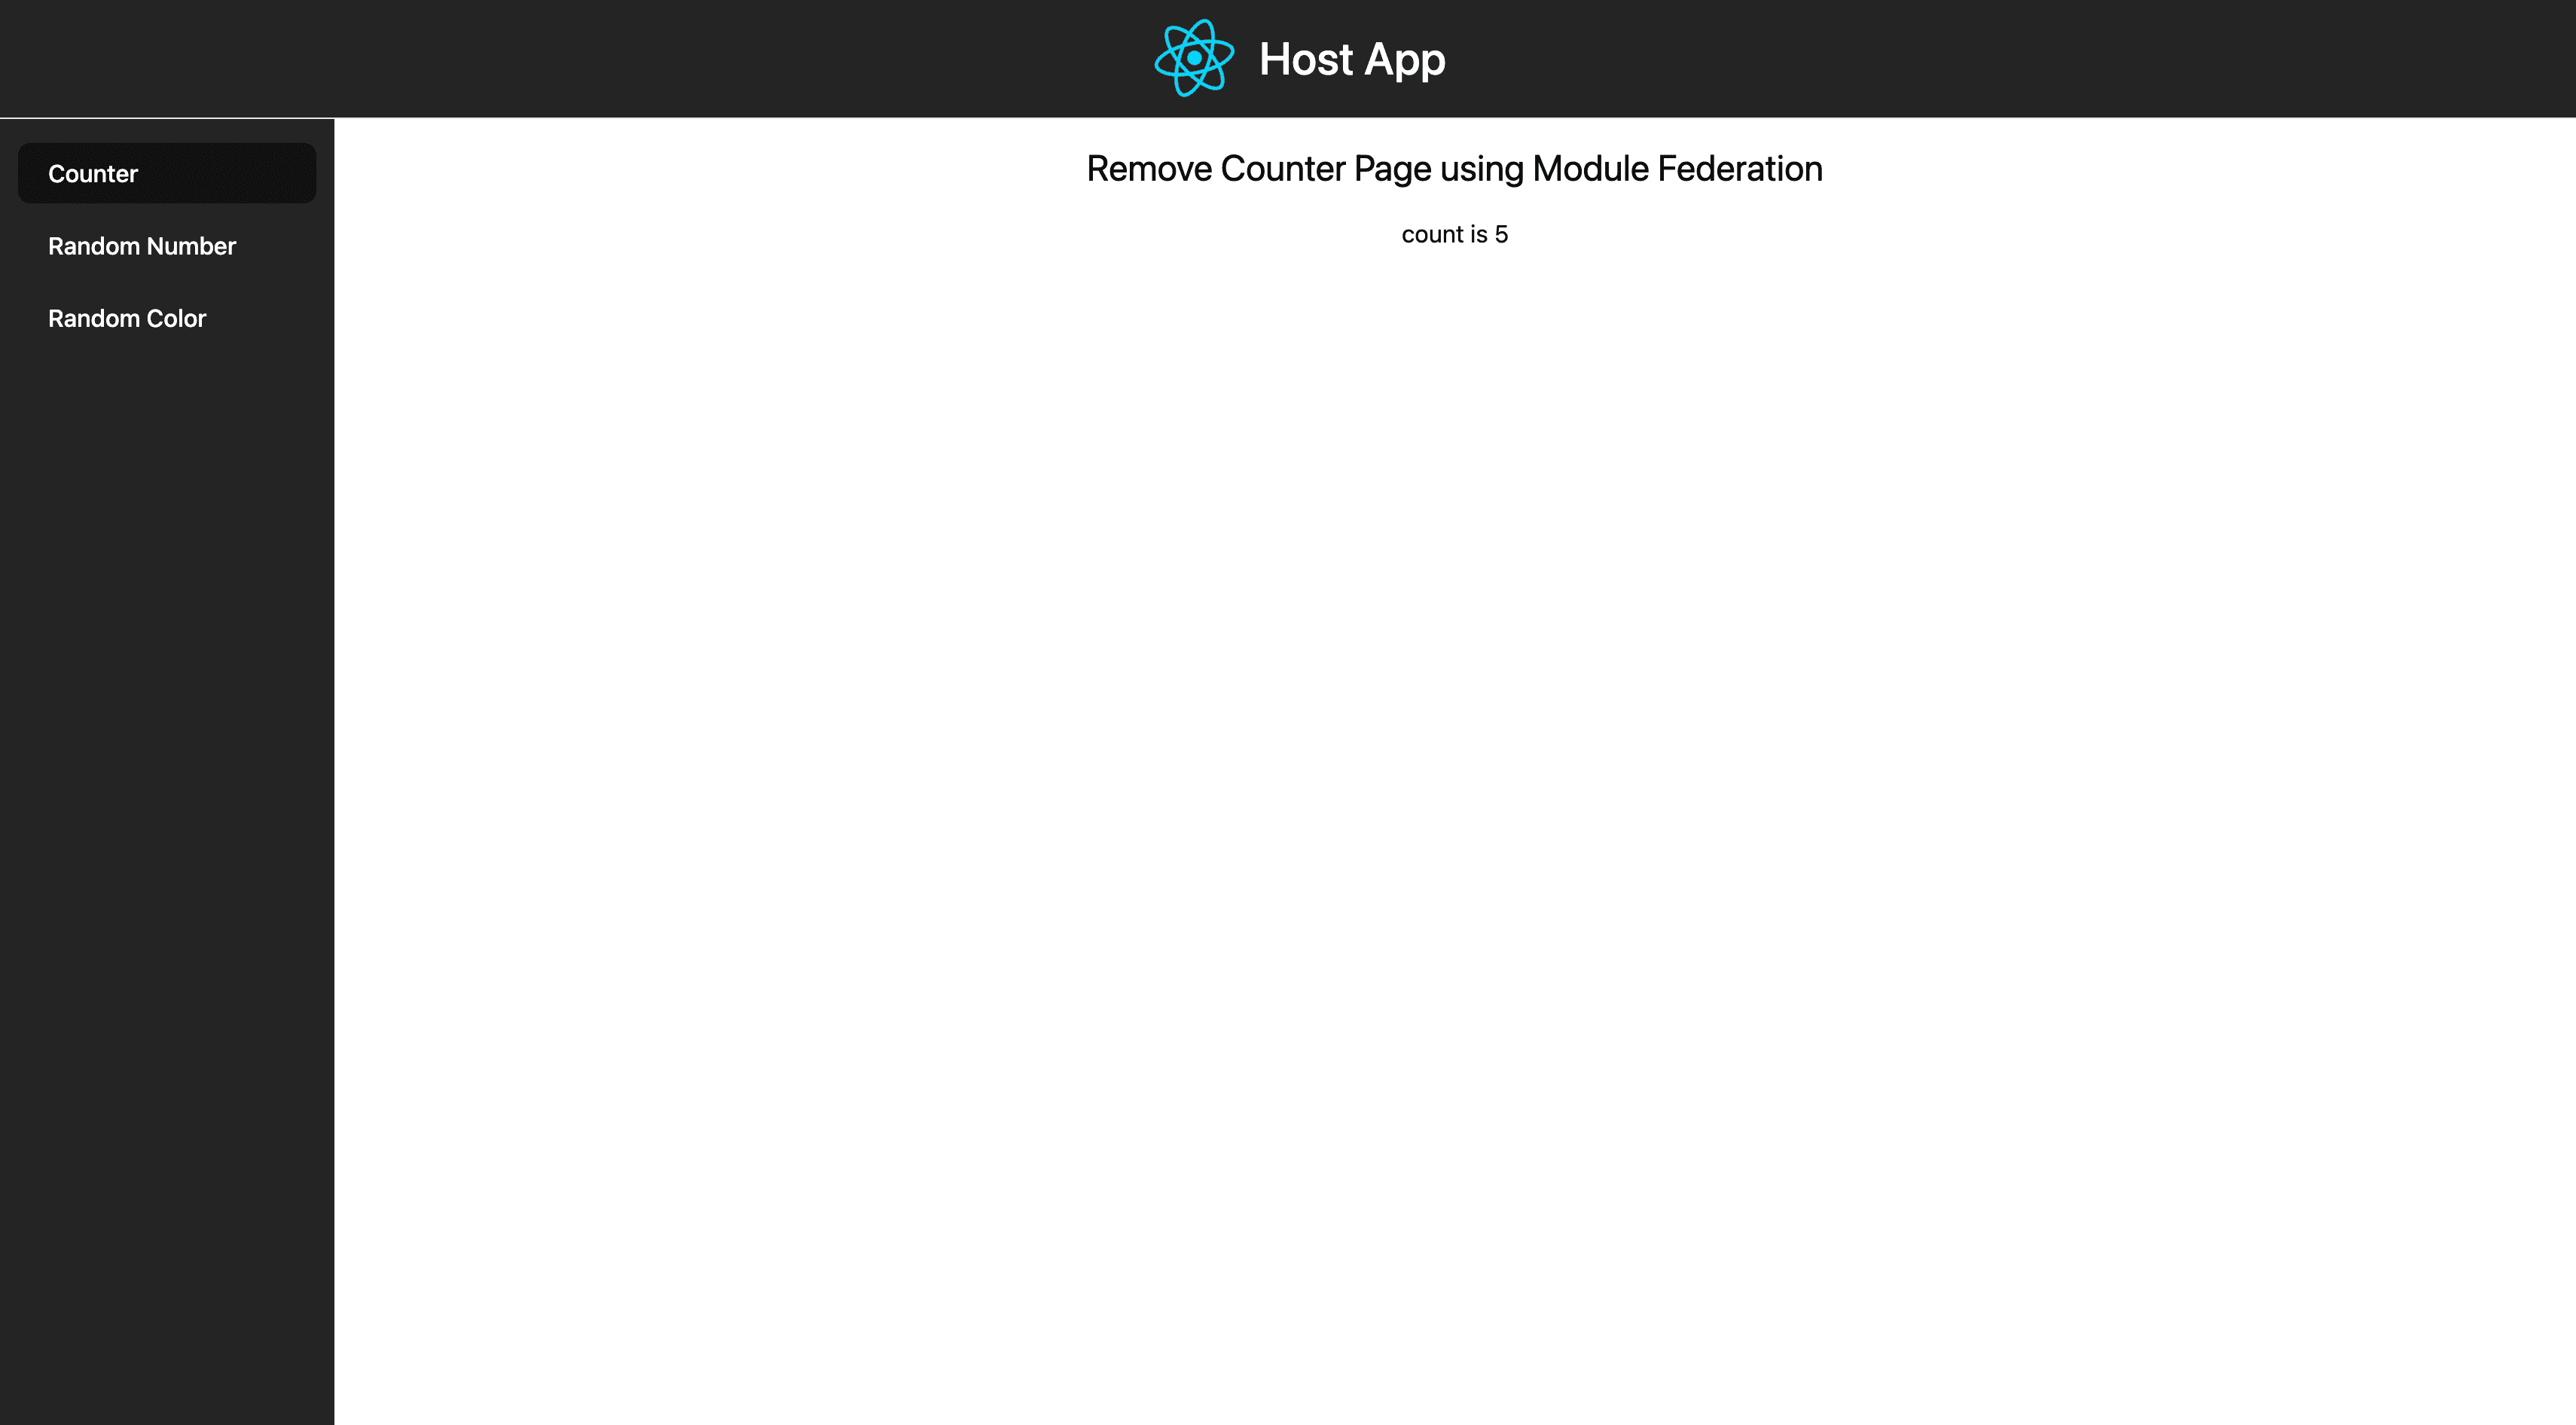
To illustrate how micro frontends can be implemented using Module Federation, let's look at an example involving a remote and a host repository.
Remote Repo Configuration (React)
In the remote repository, we have a simple counter page component and the Vite configuration to expose this component using Module Federation.
CounterPage Component:
// src/pages/CounterPage.tsx
import { useState } from 'react'

const CounterPage = () => {
  const [count, setCount] = useState(0)

  return (
    <div className="counter_container">
      <h1>Remote Counter Page using Module Federation</h1>

      <div className="btn_card">
        <button onClick={() => setCount(count + 1)}>count is {count}</button>
      </div>
    </div>
  )
}

export default CounterPage
Vite Configuration:
// vite.config.ts
import { defineConfig } from 'vite'
import react from '@vitejs/plugin-react'
import federation from '@originjs/vite-plugin-federation'
import fs from 'fs'
import path from 'path'

// https://vitejs.dev/config/
/**
 * Dynamically reads all .tsx files in the 'src/pages' directory and creates a mapping for module federation.
 * Files named 'index.tsx' are excluded from this mapping.
 */
const pagesDir = path.resolve(__dirname, 'src/pages')
const pages = fs.readdirSync(pagesDir).reduce((acc: Record<string, string>, file) => {
  const ext = path.extname(file)
  const name = path.basename(file, ext)
  const componentPath = `pages/${name}`
  if (name !== 'index' && ext === '.tsx') {
    acc[`./${componentPath}`] = `./src/${componentPath}`
  }

  return acc
}, {})

/**
 * Vite configuration for a module federation build.
 * This configuration sets up a React application as a remote module.
 */
export default defineConfig({
  plugins: [
    // Plugin for React support in Vite.
    react(),
    // Plugin for Module Federation setup.
    federation({
      // Name of the remote module.
      name: 'RemoteEntryReactMF',
      // Filename for the generated manifest file.
      filename: 'remoteEntryReactMF.js',
      // Modules exposed by this remote.
      exposes: {
        ...pages,
      },
      // Shared dependencies.
      shared: ['react'],
    }),
  ],
  server: {
    // Port for development server.
    port: 3001,
  },
  preview: {
    // Port for preview server.
    port: 3001,
  },
  resolve: {
    alias: {
      // Path alias for imports.
      '@': '/src',
    },
  },
  build: {
    // Target build format.
    target: 'esnext',
  },
})
You can find the remote repository here.
Host Repo Configuration (React)
In the host repository, we configure Vite to consume the remote component and use it within the host application.
Vite Configuration:
// vite.config.ts
import { defineConfig } from 'vite'
import react from '@vitejs/plugin-react'
import federation from '@originjs/vite-plugin-federation'

// https://vitejs.dev/config/
export default defineConfig({
  plugins: [
    react(),
    federation({
      name: 'HostApp',
      remotes: {
        RemoteEntryReactMF: 'http://localhost:3001/assets/remoteEntryReactMF.js', // URL of the remote entry file
      },
      shared: ['react'], // Shared dependencies
    }),
  ],
  server: {
    port: 3000, // Port for the host application
  },
  preview: {
    port: 3000,
  },
  resolve: {
    alias: {
      '@': '/src', // Alias for the source directory
    },
  },
  build: {
    target: 'esnext', // Build target
  },
})
Using the Remote Component:
import { lazy, Suspense } from 'react'

// Lazy load the remote component
const CounterPage = lazy(() => import('RemoteEntryReactMF/pages/CounterPage'))

const Counter = () => {
  return (
    <Suspense fallback={<div>Loading...</div>}>
      <CounterPage /> {/* Render the remote component */}
    </Suspense>
  )
}

export default Counter
You can find the host repository here.
This example demonstrates how to set up a remote and host repository using Module Federation, enabling independent development and deployment of micro frontends.
2. Web Components
Web Components allow you to encapsulate and separate different aspects of the UI. Because they are part of the native browser API, they work well across various frameworks and libraries, making them a flexible choice for building micro frontends.
Example: Web Components Integration
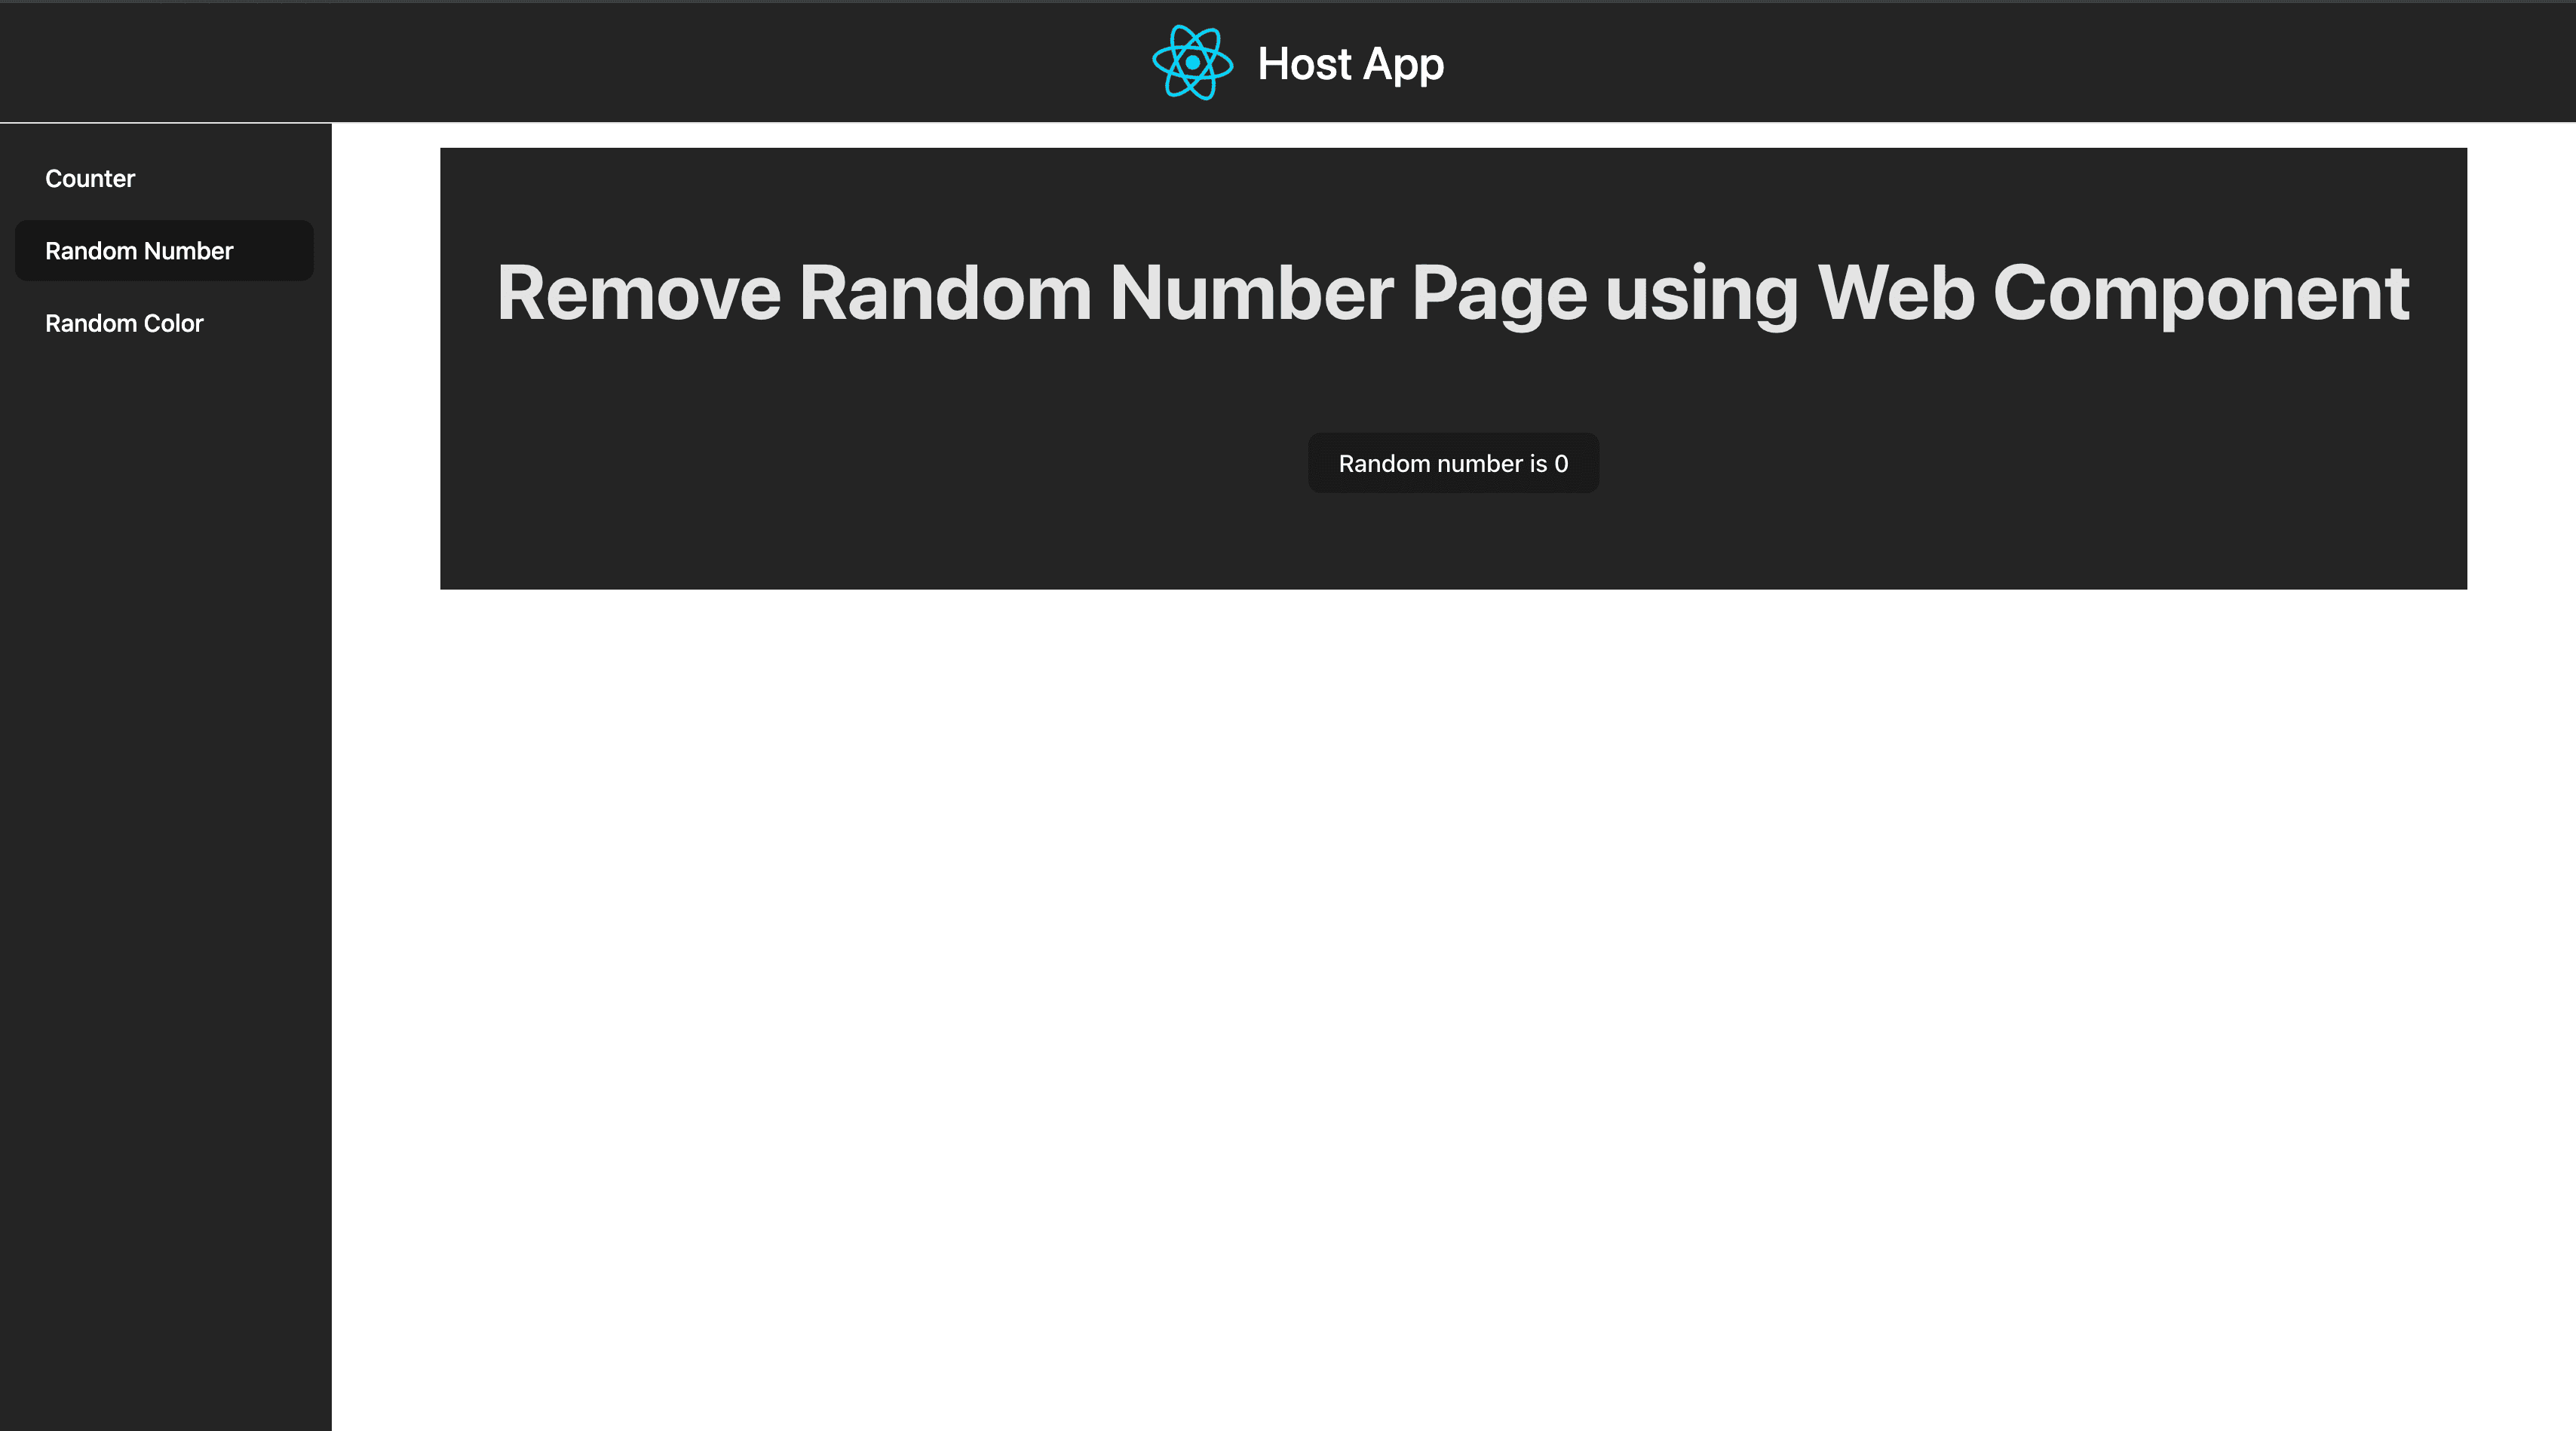
In this example, we demonstrate how to use Web Components to integrate a remote application into a host application. This approach leverages the native browser API to encapsulate and separate different aspects of the UI, making it a flexible choice for building micro frontends.
Remote App Configuration (React)
The remote application provides a simple page that generates a random number when a button is clicked. Here is the configuration for the remote app:
App Component:
// src/App.tsx
import { useState } from 'react'
import './App.css'

function App() {
  const [number, setNumber] = useState(0)

  const getRandomNumber = () => {
    return Math.ceil(Math.random() * 100) + 1
  }

  return (
    <>
      <h1>Remote Counter Page using Web Component</h1>

      <div className="card">
        <button onClick={() => setNumber(getRandomNumber())}>Random number is {number}</button>
      </div>
    </>
  )
}

export default App
Web Component Definition:
// src/RandomNumberPage.tsx
import ReactDOM from 'react-dom/client'
import AppPage from './App'

// Import CSS styles for the project and the App component.
// The '?inline' query parameter enables CSS Modules with inline styles.
import ProjectStyle from './index.css?inline'
import AppStyle from './App.css?inline'

// Define a custom HTML element named 'RandomNumberPage'.
class RandomNumberPage extends HTMLElement {
  // Lifecycle method called when the element is connected to the DOM.
  connectedCallback() {
    // Create a div element to serve as the mount point for the React application.
    const mountPoint = document.createElement('div')
    mountPoint.id = 'root'

    // Create a shadow DOM for the custom element with 'open' mode.
    const shadowRoot = this.attachShadow({ mode: 'open' })

    // Create a style element and set its content to include project and app styles.
    const style = document.createElement('style')
    style.textContent = `
            ${ProjectStyle}
            ${AppStyle}
        `

    // Append the style element and the mount point to the shadow DOM.
    shadowRoot.appendChild(style)
    shadowRoot.appendChild(mountPoint)

    // Create a React root using the mount point.
    const root = ReactDOM.createRoot(mountPoint)
    // Render the AppPage component into the root.
    root.render(<AppPage />)
  }
}

// Define the 'random-number-page' custom element using the RandomNumberPage class.
customElements.define('random-number-page', RandomNumberPage)
Vite Configuration:
import { defineConfig } from 'vite'
import react from '@vitejs/plugin-react'

// https://vitejs.dev/config/
export default defineConfig({
  plugins: [react()],
  server: {
    port: 5500,
  },
  preview: {
    port: 5500,
  },
  build: {
    lib: {
      entry: './src/RandomNumberPage',
      name: 'RandomNumberPage',
      fileName: (format) => `RandomNumberPage.${format}.js`,
    },
  },
  define: {
    'process.env': {
      NODE_ENV: 'production',
    },
  },
})
You can find the remote repository here.
Host App Configuration (React)
The host application uses the web component to embed the remote application. Here is the configuration for the host app:
RandomNumber Component:
// src/pages/RandomNumber.tsx
import { useEffect } from 'react'

const RandomNumber = () => {
  useEffect(() => {
    // Dynamically load the web component script
    const script = document.createElement('script')
    script.src = 'http://localhost:5500/RandomNumberPage.umd.js'
    script.type = 'module' // Ensure it's loaded as an ES module
    script.onload = () => {
      console.log('Web component loaded!')
    }
    document.body.appendChild(script)

    return () => {
      document.body.removeChild(script) // Clean up script when component unmounts
    }
  }, [])

  return (
    <div>
      <random-number-page />
    </div>
  )
}

export default RandomNumber
You can find the host repository here.
This example shows how to use Web Components to integrate a remote application into a host application, providing a flexible way to embed micro frontends.
3. IFrames
IFrames are the simplest method for embedding micro frontends. While easy to implement, they come with challenges like cross-origin communication and limited ability to share global state.
Example: IFrame Integration
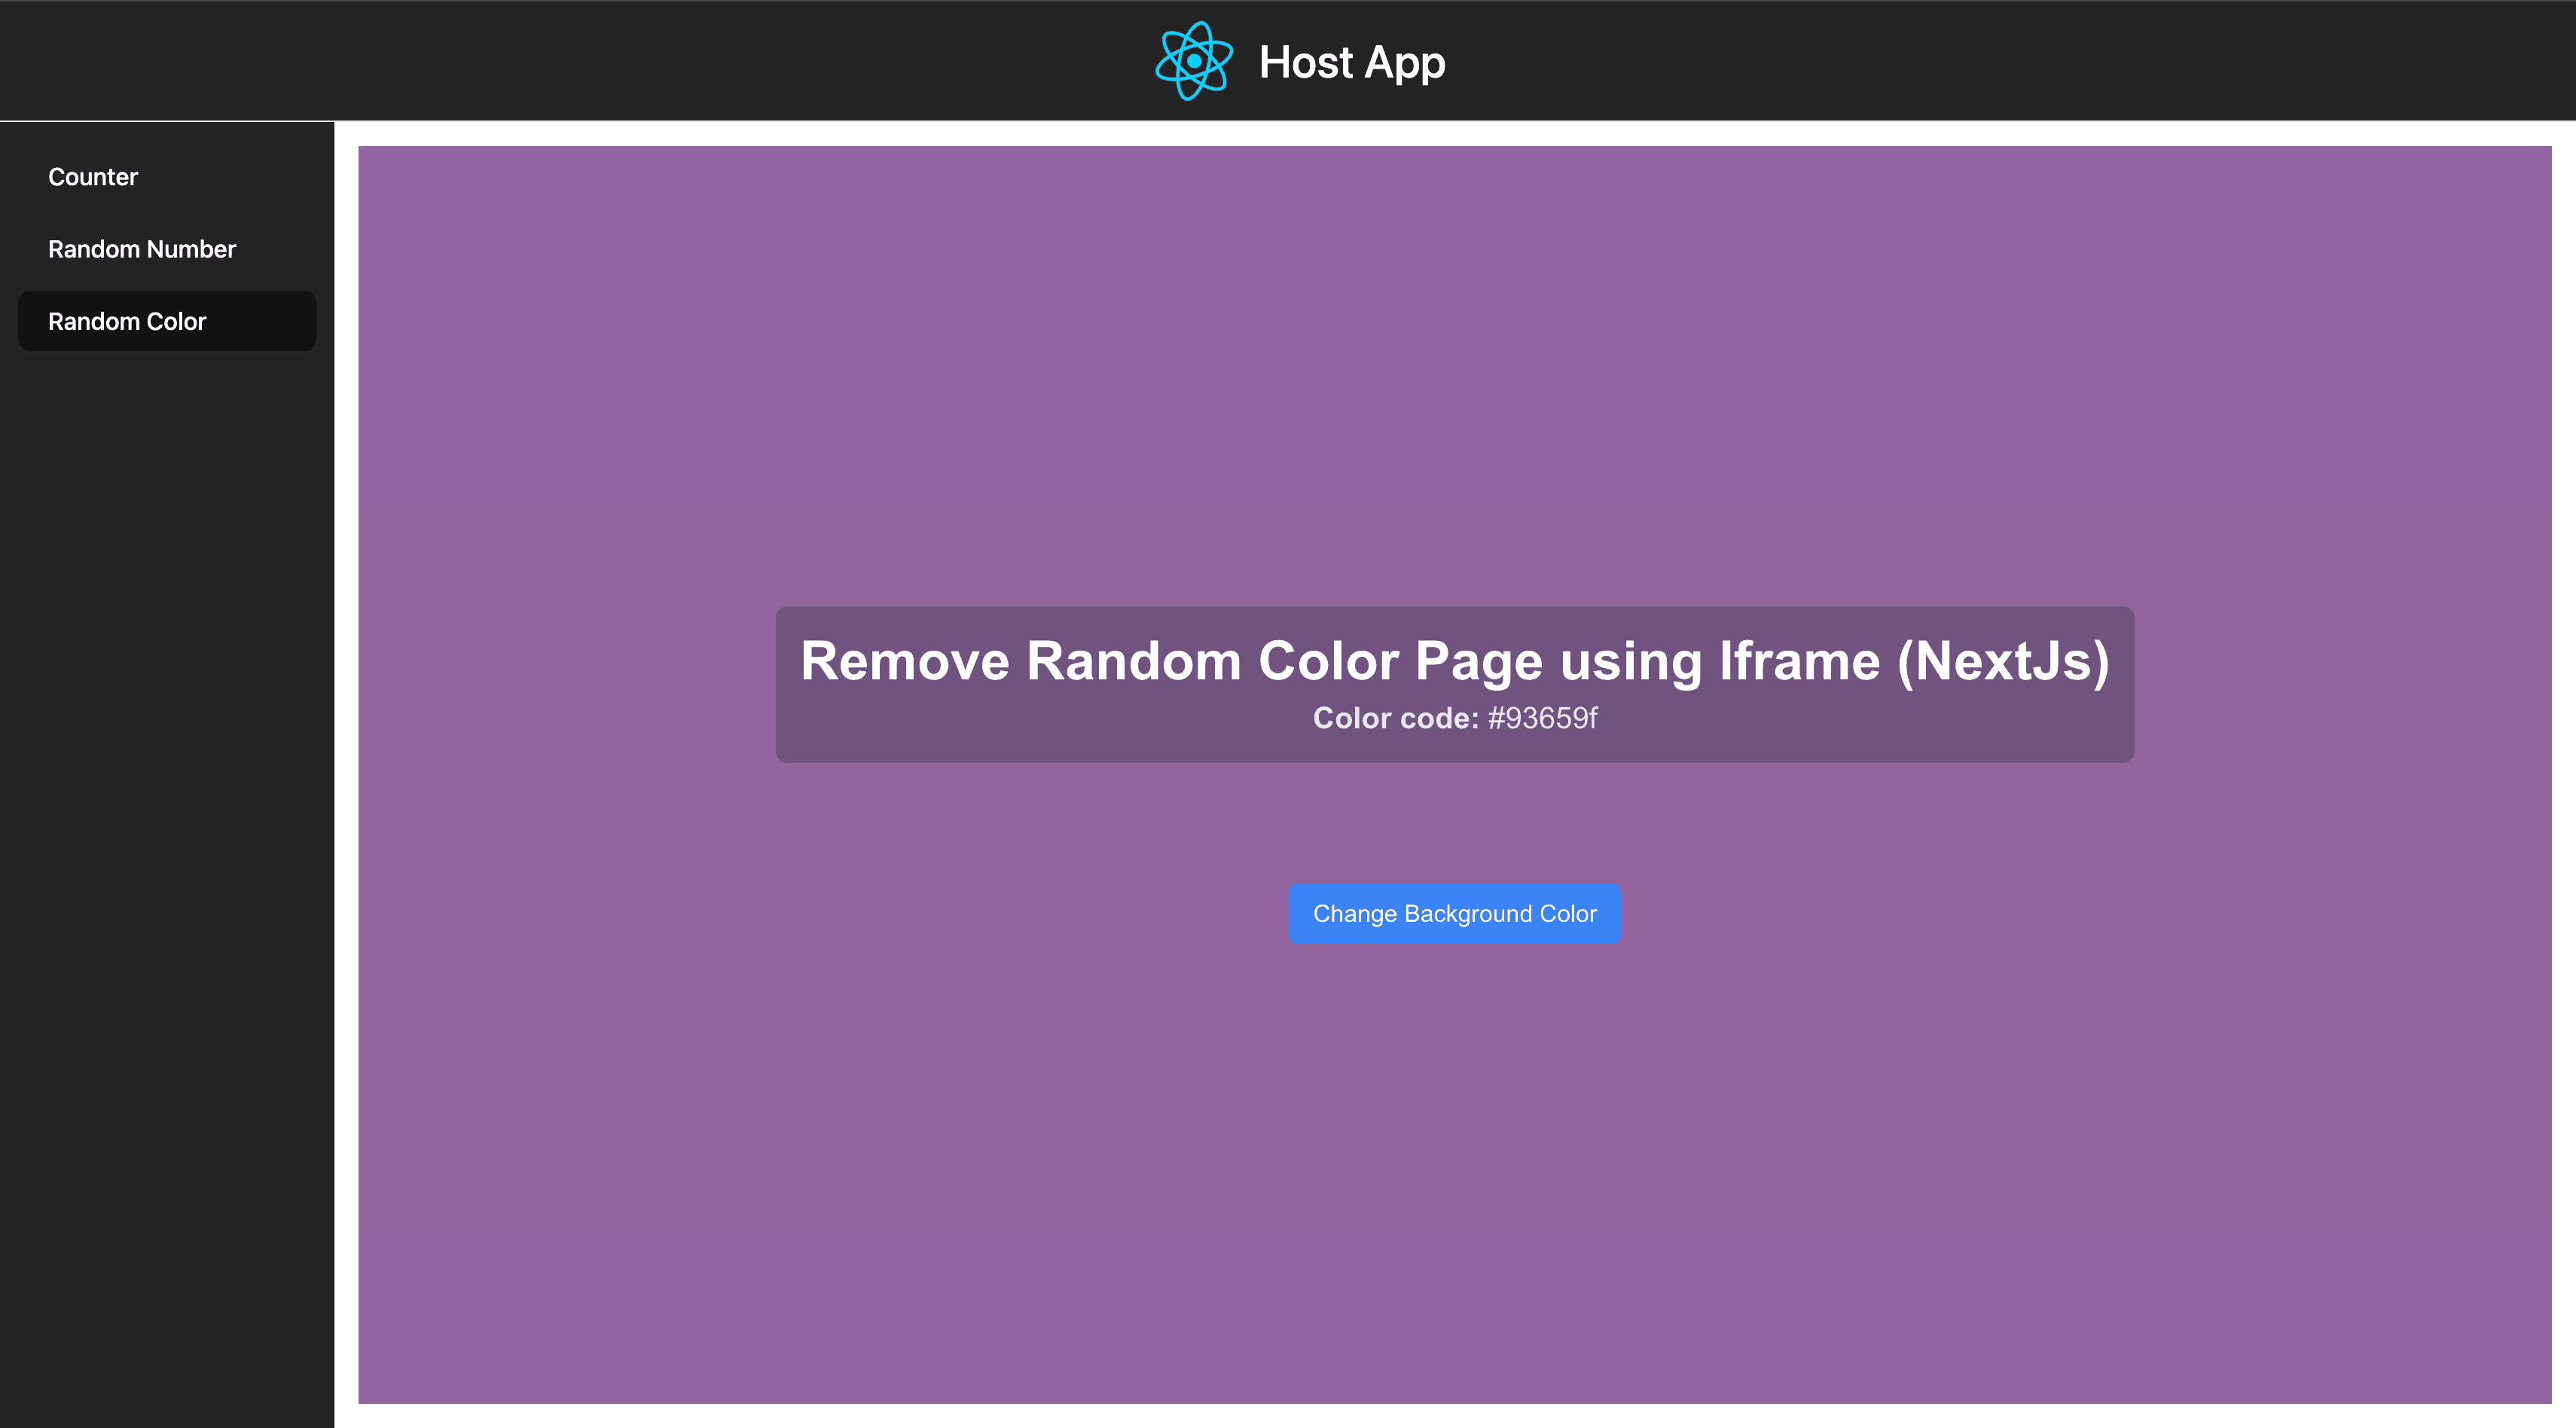
In this example, we demonstrate how to use IFrames to integrate a remote application into a host application. This approach is straightforward but comes with some limitations, such as cross-origin communication and limited ability to share global state.
Remote App Configuration (Next.js)
The remote application provides a simple page that changes its background color when a button is clicked. Here is the configuration for the remote app:
// app/page.tsx
'use client'
import { useState } from 'react'

const Home = () => {
  const [bgColor, setBgColor] = useState('#242424')

  // Function to generate a random hex color
  const getRandomHexColor = () => {
    return '#' + Math.floor(Math.random() * 16777215).toString(16)
  }

  return (
    <div
      className="flex items-center justify-center h-screen"
      style={{ backgroundColor: bgColor }} // Set background color
    >
      <div className="text-center">
        <div className="p-4 bg-gray-800/30 mb-20 rounded-lg">
          <h1 className="text-4xl font-bold text-white mb-1">
            Remote Random Color Page using IFrame (Next.js)
          </h1>

          <p className="text-xl font-bold">
            Color code: <span className="font-normal">{bgColor}</span>
          </p>
        </div>

        <button
          className="px-4 py-2 text-white bg-blue-500 rounded-md"
          onClick={() => setBgColor(getRandomHexColor())} // Change background color on click
        >
          Change Background Color
        </button>
      </div>
    </div>
  )
}

export default Home
You can find the remote repository here.
Host App Configuration (React)
The host application uses an IFrame to embed the remote application. Here is the configuration for the host app:
// src/pages/RandomColor.tsx
const RandomColor = () => {
  return (
    <div className="flex items-center justify-center h-full">
      <iframe
        className="h-full w-full"
        src="http://localhost:8080/" // URL of the remote application
      />
    </div>
  )
}

export default RandomColor
You can find the host repository here.
This example shows how to use IFrames to integrate a remote application into a host application, providing a simple way to embed micro frontends.
Advantages of Micro Frontends
Scalability: Micro frontends allow applications to grow by simply adding new independent modules as needed. This makes it easier to scale large applications.
Independent Development: Teams can build and deploy their modules independently, which speeds up the development process and reduces bottlenecks.
Technology Flexibility: Different teams can use different technology stacks. For example, one micro frontend might use React while another could be built with Angular or Vue, depending on the team's preference.
Maintainability: Smaller codebases are generally easier to maintain, debug, and test, leading to improved long-term productivity.
Stability: If one micro frontend fails, the rest of the application can still function. This isolation improves overall application resilience.
Disadvantages of Micro Frontends
Increased Complexity: Managing multiple micro frontends introduces complexity. It requires careful planning, data sharing and maintaining a consistent user experience across components. This complexity can provide difficulties in debugging and code management.
Performance Overhead: Micro frontends can introduce performance bottlenecks due to increased communication between different parts of the app. Optimizing network requests and lazy loading modules are essential practices to mitigate this.
Coordination Overhead: Good communication and coordination between teams are necessary to avoid integration issues, version conflicts, and feature inconsistencies.
Testing Overhead: Testing micro frontends in isolation and together requires more effort. Unit testing, integration testing, and end-to-end testing must account for the interactions between different micro frontends.
Maintenance and Security Overhead: Maintaining multiple independently deployed micro frontends requires careful dependency management, consistent security patching, and version control, which can be resource-intensive and complex.
Higher Costs: Implementing micro frontends may increase costs due to the additional infrastructure, time, and resources required to manage and deploy numerous independent apps, as well as the increased coordination and maintenance activities.
Best Practices for Implementing Micro Frontends
Define Clear Boundaries: Create clear boundaries for each micro frontend based on business domains or user workflows. This allows teams to work independently and makes it easier to scale and maintain the project over time.
Establish a Common Design System: Use a common design system to ensure visual and functional consistency across micro frontends. This helps maintain a seamless user experience and reduces the need for custom styling, minimizing redundancy across components.
Optimize for Performance: Minimize network requests/queries, avoid duplicate dependencies, and use caching and lazy loading strategies. These techniques minimize load times and ensure each micro frontend performs optimally when integrated.
Standardize Communication and Data Sharing: Define the protocols for how micro frontends will communicate with one another whether through a shared state, event bus, or other techniques. Clear data-sharing conventions help reduce dependency and avoid complications caused by inconsistent data.
Decouple Dependencies: Minimize mutual dependencies between micro frontends. Independent dependency management enables each micro frontend to run and be updated independently, making maintenance and deployments more seamless.
Use Independent Deployment Pipelines: Create deployment pipelines that will allow each micro frontend to be build, tested, and deployed individually. This reduces integration risks and allows for rapid, discrete upgrades without affecting the entire system.
Invest in Automated Testing: Implement robust testing strategies that cover both isolated unit tests and integrated end-to-end tests. Automated testing ensures that each micro frontend functions correctly on its own and with others, helping to catch integration issues early.
Centralized Authentication and Security: Implement a centralized authentication and authorization system to handle user access across micro frontends. This approach simplifies security management and ensures consistent enforcement of access policies.
Monitor and Log Independently: Set up separate monitoring and logging for each micro frontend to quickly find out and rectify issues. This allows for effective troubleshooting and specific health management of each micro frontend.
Plan for Version Control and Dependency Management: Use version control policies that allow micro frontends to evolve independently without causing version conflicts. Dependency management tools and strategies can help maintain stable versions and prevent incompatible updates.
Establish Strong Cross-Team Collaboration: Encourage open communication and coordination among teams handling different micro frontends. Shared documentation, regular syncs and agreement on goals and processes can all contribute to smooth integration and a cohesive end product.
Conclusion
Micro frontends offer a modern, scalable solution for large and complex web applications, enabling teams to work independently while maintaining a unified user experience. However, implementing micro frontends comes with its own set of challenges, including increased complexity, coordination, and testing efforts. By using approaches like Module Federation, Web Components, and IFrames, you can break down a monolithic frontend and embrace the flexibility and modularity of micro frontends.
